You can design and make your own copper heat sink CPU. Copper moves heat very fast, and it does this much better than aluminum.
Copper’s high thermal conductivity means it takes heat from your CPU quickly. Many people try custom solutions for special cases or unique setups involving a copper heat sink CPU. You might not always see big performance gains, as some CPUs have built-in power limits. However, a custom fit can still help with compatibility and cooling. Planning, knowing your CPU’s needs, and picking the right materials will help you get the best results.
Key Takeaways
- Copper works best for heat sinks because it moves heat well. Pick C11000 copper for good performance and lower cost.
- Check your CPU’s Thermal Design Power (TDP) and top case temperature before you design the heat sink. This makes sure it will cool your CPU enough.
- Make your heat sink bigger by adding fins. More fins help move heat away faster, especially if you use a fan.
- Use Computer-Aided Design (CAD) software to build a 3D model of your heat sink. This lets you see how it fits and change things before you cut the copper.
- Try your heat sink in real use to see if it cools well. Watch the temperatures and change things if you need better cooling.
Planning Your Copper Heat Sink CPU
Assessing CPU Cooling Needs
You want your copper heat sink cpu to handle the heat your processor puts out. Start by checking your CPU’s Thermal Design Power (TDP). This number tells you how much heat your chip makes when working hard. Look at the maximum case temperature the manufacturer recommends. Think about the safety margin if you plan to overclock or use turbo boost. You should also consider the relationship between case temperature, ambient temperature, and thermal resistance. The heat sink’s thermal resistance matters too. If you pick a design with low thermal resistance, it will move heat away faster.
Tip: Write down your CPU’s TDP and max temperature before you start designing. This helps you set clear goals for cooling.
- TDP (Thermal Design Power)
- Maximum allowed case temperature
- Safety margin for turbo or overclocking
- Thermal resistance of the heat sink
- Thermal power generated by the CPU
Space and Compatibility
You need to make sure your copper heat sink cpu fits your motherboard and case. Measure the space around your CPU socket. Here’s how you can do it:
- Measure the height of your cooler and check if it fits inside your case.
- Look up the specs for your case and cooler on the manufacturer’s website.
- Check the clearance around the CPU socket. Make sure the cooler won’t bump into RAM sticks or the side panel.
Note: Double-check these measurements before you start cutting copper. A heat sink that doesn’t fit wastes time and money.
Tools and Materials
Gather your tools and materials before you begin. You’ll need copper metal stock for the main body. Use a hacksaw or jigsaw to cut the copper. Smooth the edges with a metal file and sandpaper. A drill helps you make holes for mounting. You’ll also need thermal adhesive or epoxy, thermal paste, and measuring tools like calipers and a ruler. Don’t forget safety gear—gloves and goggles protect you while you work.
- Copper metal stock
- Hacksaw or jigsaw
- Metal file
- Sandpaper (120–400 grit)
- Drill
- Thermal adhesive or epoxy
- Thermal paste
- Calipers and ruler
- Gloves and goggles
Choosing Copper Material

Copper Grades
Not all copper is the same. When you pick copper for your project, you want to know which grade works best. Most people use C11000 copper for heat sinks. It has great thermal conductivity and is easy to work with. If you want even better performance, you can look at C10100 copper. This grade has higher purity and conducts heat a little better, but it costs more. Here’s a quick comparison:
Tip: For most DIY builds, C11000 gives you the best mix of price and performance.
Sourcing Copper
You can find copper for your heat sink from many places. Online metal suppliers, local hardware stores, or specialty electronics shops often carry copper sheets and bars. Some companies, like Lori Thermal, sell copper heat sinks made for CPUs. They offer different models and can ship worldwide. Here’s an example of what you might find:
Note: Always check the purity and thickness before you buy. High-purity copper works best for a copper heat sink cpu.
Weight and Size
Copper is heavy. When you design your heat sink, you need to think about how much weight your motherboard can handle. If your heat sink is too heavy, it could stress the motherboard or even crack it, especially if you move your PC. Here are some things to keep in mind:
- Make sure the mounting system supports the weight.
- Check that the heat sink does not block RAM slots or touch the case side panel.
- Try to keep the size reasonable so you do not risk damage if the PC gets bumped or dropped.
Remember: A good fit keeps your system safe and running cool.
Design Basics
Surface Area and Fins
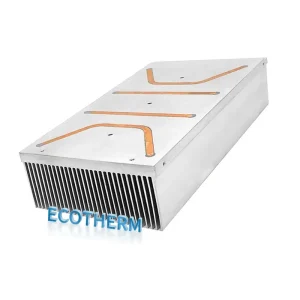
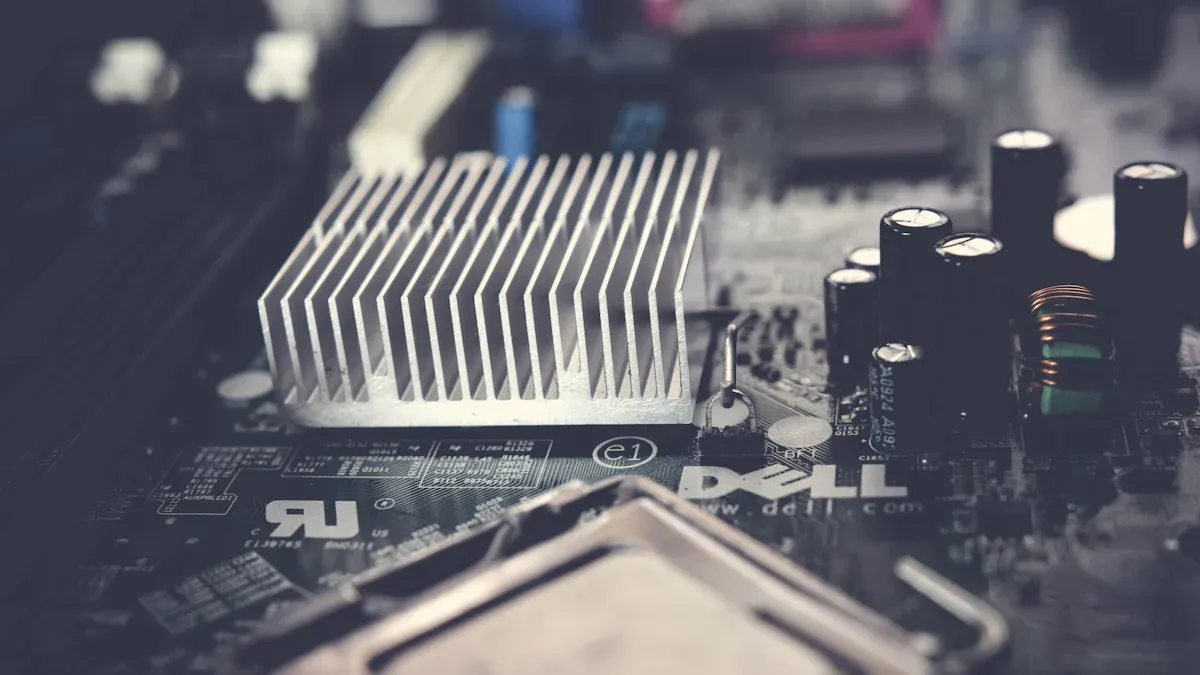
When you design a heat sink, you want to move as much heat as possible away from your CPU. The best way to do this is by increasing the surface area. More surface area means more room for heat to escape into the air. Fins help a lot with this. They stick out from the base and give you extra space for cooling.
You can pick different fin shapes and patterns. Some fins are straight, while others have a wave shape. The shape and number of fins change how well your heat sink works. If you use a fan (active cooling), the heat transfer gets even better.
Here’s a table that shows how different fin designs affect heat transfer:
Tip: Wave fins work better than straight fins, especially if you use a fan. More fins and more surface area mean better cooling for your copper heat sink cpu.
Lattice Structures
You might want to try lattice structures if you want to get creative. Lattice means a pattern of crisscrossed bars or beams. This design gives you lots of surface area without making the heat sink too heavy. Lattice fins let air flow through easily, which helps carry heat away faster.
Some people use 3D printing or CNC machines to make these shapes. You can make the lattice as tight or as open as you want. A tight lattice gives you more surface area, but it can block airflow if you make it too dense. An open lattice lets air move freely, but you lose some cooling power.
Note: Lattice structures look cool and work well, but they can be harder to make at home. If you have the right tools, give it a try!
Custom Fit for CPU
You want your heat sink to fit your CPU perfectly. A custom fit means better contact and better cooling. Here’s what you need to think about when you design a custom copper heat sink cpu:
- Understand how much heat your CPU makes and how cool you want it to stay.
- Pick the right material. Copper works best for heat, but you can also use aluminum if you want to save money.
- Measure the space around your CPU. Make sure your heat sink fits without hitting other parts.
- Use software to model how heat will move through your design.
- Plan the shape and layout of your fins to get the most cooling.
- Decide how thick the copper should be. You can also add heat pipes for extra cooling.
- Choose a good thermal paste or pad to help heat move from the CPU to the heat sink.
- Pick a way to make your heat sink. You can use CNC machines, casting, or even 3D printing.
- Test your heat sink to make sure it works and fits well.
Remember: A custom fit gives you the best cooling and keeps your CPU safe.
Copper Heat Sink CPU Design
Thermal Analysis
Before you start building, you need to know how well your design will move heat away from your CPU. You can use different methods to check this. Some are quick and simple, while others give you a deep look at how heat flows.
Here’s a table that shows common ways to do thermal analysis:
You can start with simple math to guess how much heat your copper heat sink cpu can handle. If you want to get fancy, you can use CFD software. This lets you see how air and heat move together. If you have the tools, you can use an infrared camera to spot hot spots after you build your heat sink. This helps you find places that need better cooling.
Tip: Try using more than one method. Start simple, then use more advanced tools if you want to make your design even better.
Fin Arrangement
Fins are the thin pieces of metal that stick out from your heat sink. They help move heat into the air. The way you arrange and space your fins makes a big difference in how well your heat sink works.
- The arrangement and spacing of fins are crucial for optimizing surface area for heat dissipation.
- Proper spacing between fins enhances convection cooling by allowing sufficient airflow.
- Balancing surface area and airflow is essential for effective cooling performance.
If you put fins too close together, air can’t move through them. This traps heat and makes your CPU run hotter. If you space them too far apart, you lose surface area, and your heat sink can’t move as much heat. You want to find the sweet spot where you get lots of surface area and good airflow.
You can try different patterns, like straight lines or zigzags. Some people use taller fins, while others use shorter, wider ones. You can test your design by blowing smoke or using a fan to see how air moves through the fins.
Note: Always check that your fins don’t block other parts in your PC. Good airflow keeps your copper heat sink cpu working its best.
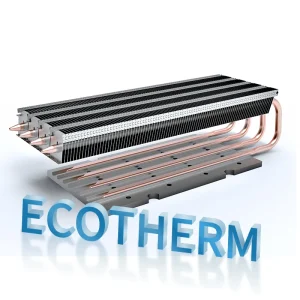
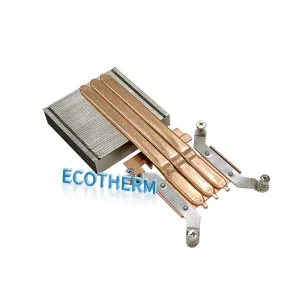
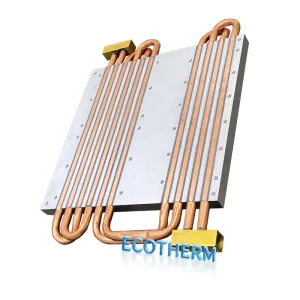
Heat Pipe Options
Sometimes, you need even more cooling power. That’s where heat pipes come in. These are special tubes that move heat from one place to another very quickly. Most heat pipes use copper because it works well with copper heat sinks. You might also see aluminum, stainless steel, or even titanium in special cases.
- Copper is the most commonly used material for heat pipe enclosures, followed by aluminum.
- Other materials like stainless steel and titanium are used in specific applications.
Heat pipes help your heat sink spread heat out and lower the temperature faster. They can boost the efficiency of your air-cooled heat sink by up to 20% compared to just using a solid copper base. Heat pipes also help remove hot spots and keep your CPU cooler all over.
Copper-water heat pipes work especially well with copper heat sinks. This combo gives you great heat transfer and helps your system stay cool, even when you push your CPU hard.
Tip: If you want top performance, try adding heat pipes to your design. They make a big difference, especially for high-power CPUs.
Prototyping and Modeling
CAD Models
You want your copper heat sink to fit just right. The best way to do this is by making a digital model first. Computer-Aided Design (CAD) software lets you build a 3D version of your heat sink before you touch any copper. You can see how the fins look, check the size, and make sure everything lines up with your CPU and motherboard.
Most people use free or low-cost CAD tools like TinkerCAD, Fusion 360, or FreeCAD. These programs let you drag and drop shapes, change measurements, and even spin your design around to see it from every angle. You can also use CAD to test how your heat sink will fit inside your case. If you spot a problem, you can fix it in the software instead of wasting copper.
Tip: Save your CAD files. You might want to tweak your design later or share it with friends.
Thermal Simulation
After you finish your CAD model, you want to know if your design will keep your CPU cool. That’s where thermal simulation comes in. This step helps you see how heat moves through your heat sink and how well it will work before you build anything.
You can use special software to run these tests. Here are two popular types:
- Computational Fluid Dynamics (CFD): This tool shows how air flows around your heat sink. It helps you see if your fins get enough airflow and how much heat escapes.
- Finite Element Analysis (FEA): This method checks how heat spreads through your copper. It shows you where hot spots might form and helps you fix weak spots in your design.
These tools save you time and money. You can try out different shapes and fin patterns without cutting any metal. If you see a problem, you can go back to your CAD model and make changes. This way, you get the best cooling before you even start building.
Using CAD and thermal simulation together gives you a big advantage. You can design, test, and improve your copper heat sink all on your computer!
Manufacturing Methods
CNC Machining
CNC machining is a popular way to make a custom copper heat sink cpu. You use a computer-controlled machine to cut and shape the copper. This method gives you high precision and lets you create detailed designs. When you work with copper, you need to remember a few things:
- Avoid deep pockets. Copper does not clear chips well, so deep cuts can cause problems.
- Keep walls thick. Thin walls can vibrate and mess up the surface finish.
- Add fillets, or rounded corners. These help the tool move smoothly and reduce noise.
- Don’t over-tolerance. Copper is soft and hard to machine very tightly. Only use tight tolerances if you really need them.
You usually start by running a simulation to see how heat and air will move. Then, you make a prototype with the CNC machine. After that, you test the heat sink to see if it matches your simulation.
Tip: Precision matters! A good fit means better cooling and less wasted copper.
Other Methods
You have other ways to make a copper heat sink if you do not have access to a CNC machine. Here’s a quick look at some options:
Some DIYers use hand tools, bonding, or even skiving if they have the right gear. Each method has its own trade-offs in cost, speed, and how complex your design can be.
Pros and Cons
CNC machining gives you lots of freedom, but it is not perfect. Here’s a simple table to help you decide:
Note: Pure copper is tough to machine. It can stick to tools and get harder as you work, so take your time and check your progress often.
Assembly and Mounting
Cutting and Shaping
Getting your copper pieces ready is a big part of building your heat sink. You want every cut and bend to be clean and accurate. Here’s how you can do it:
- Mark your bending or cutting lines with a fine-tip marker or scribe. This helps you stay on track.
- Secure the copper sheet to your workbench. You don’t want it slipping while you work.
- Start with a slow, controlled cut. If you use snips, guide them along your marked line.
- For thin sheets, score the line several times with a scoring knife. Bend the sheet back and forth until it snaps.
- Keep your hands steady and move at a steady speed if you use power tools. This keeps the edges smooth.
- Smooth out any rough spots with a fine file or sandpaper.
- For curves, use a mallet and sandbag. For sharp bends, a metal brake works best.
- If you need to make complex shapes, try annealing the copper. Heat it up to soften it, then shape it with clamps or over a forming block.
Forming stakes and anvils help with tricky shapes. Hand bending over a solid block gives you smooth curves. Annealing makes copper easier to work with, especially for tight bends.
Take your time with this step. Good shaping means better contact and better cooling.
Joining Fins and Base
You want your fins to stick to the base and move heat fast. The best way to do this is by bonding, brazing, or using thermal interface materials (TIMs). Bonded fin heat sinks use a special glue, like thermal epoxy or solder, to attach the fins. This glue helps heat move from the base to the fins. Brazing is another way to join copper. It melts a filler metal between the fin and base, making a strong connection. Always use a TIM between the heat sink and CPU. TIM fills tiny air gaps and helps heat spread out faster.
A strong bond and a good TIM make your heat sink work much better.
Mounting Techniques
You need to attach your copper heat sink to the CPU so it stays put and works well. Here’s a quick look at some common ways:
Wire-form ‘Z-clips’ give you a solid hold and make it easy to swap out your heat sink. Thermal epoxy sticks things together for good, but you need to be careful when applying it.
Pick a mounting method that matches your skills and how often you plan to upgrade your CPU.
Thermal Interface Materials
TIM Selection
Picking the right thermal interface material (TIM) makes a big difference in how well your copper heat sink cools your CPU. You want something that fills tiny gaps between the metal surfaces and moves heat quickly. Not all TIMs work the same way, so you need to look at a few key things before you choose.
Here’s a table to help you compare what matters most:
You might see thermal pastes, pads, or even liquid metal. For most people, a good-quality paste or pad works best. If you want something easy, pads are simple to use. If you want the best cooling, pastes usually win.
Tip: Always check the label for thermal conductivity and make sure the TIM is safe for copper.
Application Tips
You want your TIM to work its best. Here are some simple steps to help you get it right:
- Clean both the CPU and heat sink surfaces. Wipe away old paste, dust, or oil.
- Use just the right amount of TIM. Too much or too little can trap air and hurt cooling.
- Spread the TIM evenly. Cover the whole surface so heat moves smoothly.
- Attach the heat sink with even pressure. This keeps the TIM layer thin and stops it from squeezing out.
If you follow these steps, your copper heat sink will pull heat away from your CPU much better. A little care here goes a long way!
Testing and Quality Control

Structural Checks
Before you power up your PC, you want to make sure your copper heat sink is strong and safe. Start by looking for any cracks, bends, or loose fins. Hold the heat sink and give it a gentle shake. If you hear rattling, check for loose parts. You can also press down lightly on the fins to see if they bend or break. If you used screws or clips, make sure they are tight. Some people even do a simple drop test from a short height onto a soft surface to check for weak spots. If your heat sink passes these checks, you can feel more confident about moving on.
Performance Testing
Now it’s time to see how well your copper heat sink cools your CPU. You want to test it under real-world conditions. Here’s a table that shows some common ways to test your heat sink:
You can run a stress test on your CPU and watch the temperature. If the numbers stay low, your heat sink works well. If you see high temperatures, you may need to make changes.
Tip: Always test your heat sink with the case closed and fans running. This gives you the most accurate results.
Troubleshooting
Sometimes things don’t go as planned. Here are some common problems you might see and ways to fix them:
- You get strange temperature readings. Check your thermal paste and make sure the heat sink sits flat on the CPU.
- The heat sink feels hot, but the CPU stays warm. Try adding more fins or using a better fan.
- You see bent fins or loose parts. Tighten screws and replace damaged pieces.
- You notice heat pipes leaking. Replace the pipe or seal the leak.
- Your motherboard bends under the weight. Use a stronger mounting bracket.
If you run into trouble, don’t worry. You can always adjust your design, move components, or add more cooling. Keep testing and tweaking until you get the results you want. You’ve learned how to design and build your own copper heat sink cpu. Here’s a quick recap of the most important steps:
- Shape your heat sink with fins or pins to boost surface area.
- Pick the right material—copper works best, but aluminum is an option.
- Add fans or try new designs to get even better cooling.
Try new ideas, test your builds, and share your results. You’ll feel proud when your PC runs cooler and faster!
FAQ
How do you clean a copper heat sink?
You can use isopropyl alcohol and a soft cloth. Gently rub the copper until it shines. For tough spots, try a little vinegar and salt. Rinse and dry well. Avoid harsh chemicals.
Tip: Clean your heat sink every few months for best cooling.
Can you use aluminum and copper together?
Yes, you can mix them, but watch out for corrosion. If you join copper and aluminum, use a thermal paste or pad between them. This helps stop corrosion and keeps heat moving fast.
What if your copper heat sink is too heavy?
A heavy heat sink can bend your motherboard. You should use a strong mounting bracket. Try to keep the design compact.
- Check your case for extra support.
- Avoid moving your PC too much.
Do you need a fan with a copper heat sink?
You do not always need a fan, but adding one helps a lot. A fan moves air over the fins and cools your CPU faster. If you want quiet, try a bigger heat sink with more fins.
Can you paint a copper heat sink?
You should not paint the parts that touch the CPU or where heat needs to escape. Paint blocks heat flow. If you want to paint for looks, only paint the edges or non-contact areas.